GCD死锁
一直想写一篇关于GCD死锁问题的文章, 但是后来发现了一篇文章讲得很好, 还是直接转载吧(但是把OC改为Swift 3了, 并添加了一个案例). 原文作者: brighttj(@saitjr)
死锁一直都是在使用多线程时,需要注意的一个问题。以前对同步、异步,串行、并行只有一个模糊的概念,想想也是时候整理一下了。再看看之前的博客,已经很久没有干货了【说得好像之前有干货一样】,所以,这篇博客,我尽最大努力,也借鉴了很多其他博客中的例子,来讲解GCD死锁问题。
串行与并行
在使用GCD的时候,我们会把需要处理的任务放到Block中,然后将任务追加到相应的队列里面,这个队列,叫做Dispatch Queue。然而,存在于两种Dispatch Queue,一种是要等待上一个执行完,再执行下一个的Serial Dispatch Queue,这叫做串行队列;另一种,则是不需要上一个执行完,就能执行下一个的Concurrent Dispatch Queue,叫做并行队列。这两种,均遵循FIFO原则。
举一个简单的例子,在三个任务中输出1、2、3,串行队列输出是有序的1、2、3,但是并行队列的先后顺序就不一定了。
那么,并行队列又是怎么在执行呢?
虽然可以同时多个任务的处理,但是并行队列的处理量,还是要根据当前系统状态来。如果当前系统状态最多处理2个任务,那么1、2会排在前面,3什么时候操作,就看1或者2谁先完成,然后3接在后面。
串行和并行就简单说到这里,关于它们的技术点其实还有很多,可以自行了解。
同步与异步
串行与并行针对的是队列,而同步与异步,针对的则是线程。最大的区别在于,同步线程要阻塞当前线程,必须要等待同步线程中的任务执行完,返回以后,才能继续执行下一任务;而异步线程则是不用等待。
仅凭这几句话还是很难理解,所以之后准备了很多案例,可以边分析边理解。
GCD API
GCD API很多,这里仅介绍本文用到的。
1.系统标准提供的两个队列
|
|
2.除此之外,还可以自己生成队列
|
|
3.接下来是同步与异步线程的创建:
|
|
案例与分析
假设你已经基本了解了上面提到的知识,接下来进入案例讲解阶段。
案例一:
|
|
结果,控制台输出:
|
|
分析
|
|
首先执行任务1,这是肯定没问题的,只是接下来,程序遇到了同步线程,那么它会进入等待,等待任务2执行完,然后执行任务3。但这是队列,有任务来,当然会将任务加到队尾,然后遵循FIFO原则执行任务。那么,现在任务2就会被加到最后,任务3排在了任务2前面,问题来了:
任务3要等任务2执行完才能执行,任务2由排在任务3后面,意味着任务2要在任务3执行完才能执行,所以他们进入了互相等待的局面。【既然这样,那干脆就卡在这里吧】这就是死锁。

案例二:
|
|
结果,控制台输出:
|
|
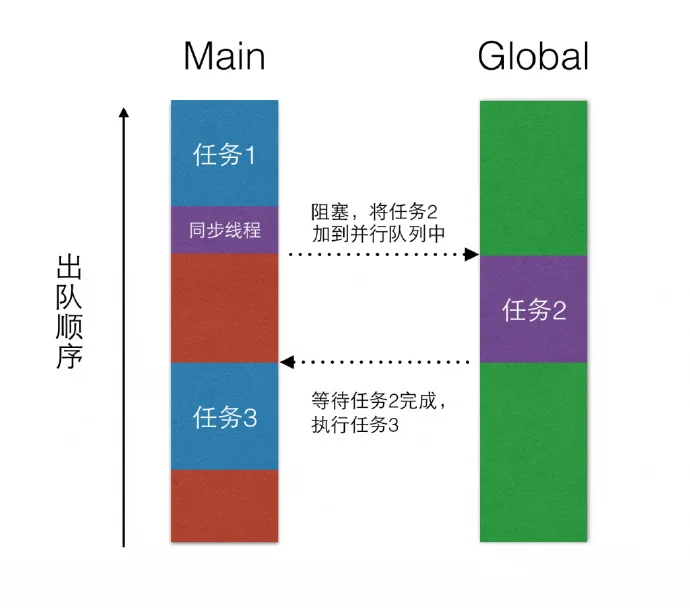
分析:
首先执行任务1,接下来会遇到一个同步线程,程序会进入等待。等待任务2执行完成以后,才能继续执行任务3。从dispatch_get_global_queue可以看出,任务2被加入到了全局的并行队列中,当并行队列执行完任务2以后,返回到主队列,继续执行任务3。
案例三:
|
|
结果,控制台输出:
|
|
分析:
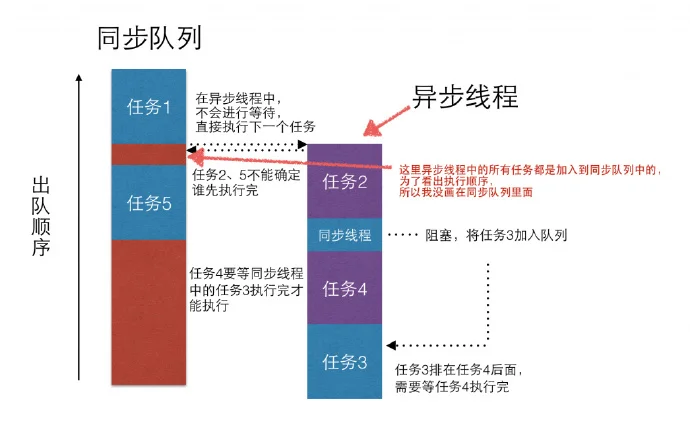
这个案例没有使用系统提供的串行或并行队列,而是自己通过DispatchQueue(label: “”)函数创建了一个的串行队列。
执行任务1;
遇到异步线程,将【任务2、同步线程、任务4】加入串行队列中。因为是异步线程,所以在主线程中的任务5不必等待异步线程中的所有任务完成;
因为任务5不必等待,所以2和5的输出顺序不能确定;
任务2执行完以后,遇到同步线程,这时,将任务3加入串行队列;
又因为任务4比任务3早加入串行队列,所以,任务3要等待任务4完成以后,才能执行。但是任务3所在的同步线程会阻塞,所以任务4必须等任务3执行完以后再执行。这就又陷入了无限的等待中,造成死锁。
案例四:
|
|
结果,控制台输出:
|
|
分析:
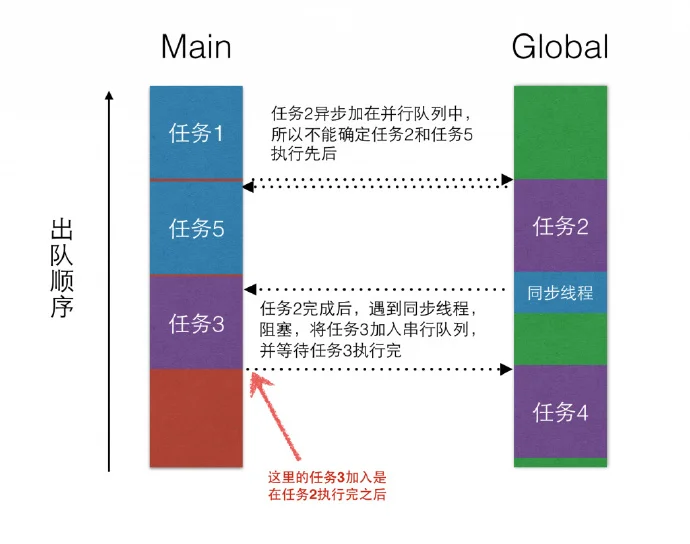
首先,将【任务1、异步线程、任务5】加入Main Queue中,异步线程中的任务是:【任务2、同步线程、任务4】。
所以,先执行任务1,然后将异步线程中的任务加入到Global Queue中,因为异步线程,所以任务5不用等待,结果就是2和5的输出顺序不一定。
然后再看异步线程中的任务执行顺序。任务2执行完以后,遇到同步线程。将同步线程中的任务加入到Main Queue中,这时加入的任务3在任务5的后面。
当任务3执行完以后,没有了阻塞,程序继续执行任务4。
从以上的分析来看,得到的几个结果:1最先执行;2和5顺序不一定;4一定在3后面
案例五:
|
|
结果,控制台输出:
|
|
分析:
和上面几个案例的分析类似,先来看看都有哪些任务加入了Main Queue:【异步线程、任务4、死循环、任务5】。
在加入到Global Queue异步线程中的任务有:【任务1、同步线程、任务3】。
第一个就是异步线程,任务4不用等待,所以结果任务1和任务4顺序不一定。
任务4完成后,程序进入死循环,Main Queue阻塞。但是加入到Global Queue的异步线程不受影响,继续执行任务1后面的同步线程。
同步线程中,将任务2加入到了主线程,并且,任务3等待任务2完成以后才能执行。这时的主线程,已经被死循环阻塞了。所以任务2无法执行,当然任务3也无法执行,在死循环后的任务5也不会执行。
最终,只能得到1和4顺序不定的结果。

案例六:
|
|
结果,控制台输出:
|
|
分析:
首先执行print(0), 然后主队列添加异步任务, 不阻塞, 所以执行print(4), 及sleep(8)阻塞, 然后再刚才的异步任务内, 同样也是先执行print(2), 然后再执行队列中的sleep(4), print(1), print(3).


